Thank you and congratulations for using Francesca theme by WebMan Design!
This user manual will teach you how to set up and use the theme. In case you have any questions that are beyond the scope of this documentation, please join WebMan Design support forum.
Enjoy your Francesca WordPress theme! Love this theme? Support it by leaving a review→
WordPress is free open source CMS software for creating websites. It can scale with your needs when you're ready to grow and is easy to learn with many free and low-cost tutorials. You can learn more about WordPress at wordpress.org.
What is a theme?
A WordPress theme changes the way your site looks and affects the style of the content displayed on it. WordPress themes are built so you can change your site's design without losing content. As you are reading a user manual for a WordPress theme and it requires WordPress to run, let's install it first.
In WordPress dashboard navigate to Appearance → Themes and click the Add New button next to "Themes" page title.
On "Add Themes" screen click the Upload Theme button next to page title.
On the next screen choose the theme ZIP file you've downloaded in step 1 above and click the Install Now button.
When the theme is installed, activate it by clicking the "Activate" link.
Now you can go to Appearance → Welcome page for information on how to set up your website and the theme. Also, please pay special attention to your website image sizes setup.
Tip:Welcome page
Don't forget to check the theme welcome page at Appearance → Welcome. It contains everything you need to start.
Tip:Get info about updates
Get fast information about new theme updates by subscribing to WebMan Design on Facebook and X (Twitter).
Important:Envato Market
If you've obtained the theme from ThemeForest (Envato Market), please make sure to unpack the downloaded ZIP package on your computer first and check if you are uploading the correct theme ZIP file (or the whole theme folder).
Basically, the theme installation ZIP file or folder is named with your theme slug only, so only francesca.
Do not install a whole ZIP package that contains other files such as documentation, child theme, licencing and others. Install only the file in francesca-package/theme folder. Otherwise you might experience a common installation error.
Download the theme ZIP package from where you've obtained it originally. Then follow the steps below:
Updating via WordPress dashboard
A simple way of doing a manual theme update is deleting and reinstalling the theme directly via WordPress dashboard. You can read an article or watch a video on how to do this.
Updating via FTP
This is more advanced manual update procedure and you will need an FTP client (such as FileZilla) to connect to your server:
Download the newest theme ZIP file from where you've obtained it and unpack the ZIP file on your computer.
Now you will need an FTP client to connect to your server.
On your server navigate to WORDPRESS_FOLDER/wp-content/themes/ folder.
Delete the existing francesca folder (or create a backup just in case - you can do this simply by renaming the folder name by appending .backup to its name so it becomes francesca.backup, for example).
Copy the unpacked theme francesca folder from your computer (from step 1 above) into WORDPRESS_FOLDER/wp-content/themes/ folder on your server.
Log into your WordPress admin area and check the version of the theme in Appearance → Themes. Your theme should be updated now. (And you can delete the francesca.backup folder from step 4 above.)
The theme contains predefined block patterns you can drag & drop into your page content in editor.
Theme demo content was actually built the same way: just stacking the block patterns to create a full demo website.
Using block patterns you can create your very own website easily and you won't need to delete obsolete leftover pages and other data from imported demo content.
The theme allows you to import a demo content, which matches theme demo website. Then you can simply change the imported demo content to your needs and build your website faster that way.
Before you import the theme demo content, please check these important notes:
Tip:Delete leftovers
Theme demo contains a lot of pages. You will certainly end up not using most of them. In that case it is strongly recommended to delete the leftover demo content you no longer need from your website. It improves your website performance and relevance.
Important:Install on fresh WordPress
It is recommended to install demo content on empty, fresh WordPress site. (If you are testing the theme on a computer and not your live website, you can always reset WordPress to a fresh state.
Warning:Images and media quality
Please understand that demo images, audio and video files are of low quality. This is to prevent any copyright infringement. You should replace them with your own, properly licensed media that fit your website project.
Recommended:Classic widgets interface
WordPress 5.8 introduced a new block-based interface to widgets and sidebars management screen. Theme demo content was built using the classic widgets interface, so it is highly recommended to install and activate Classic Widgets plugin to retrieve the classic WordPress widgets interface again.
Warning:Page builder compatibility
If you want to use a page builder, please understand that if the theme demo content was not built with your page builder, you will not be able to edit the imported demo pages.
And now, for detailed instructions about importing theme demo content please visit demo content repository at GitHub (where it is kept up to date).
Starter Content
This theme supports and contains its own WordPress starter content for easy and fast (small) website deployment.
Starter content is displayed in theme customizer on a fresh WordPress installation only. Once you save the customizer settings, the starter content will be ported into your website automatically.
If you have already created some content beforehand, the starter content will not be available for you in customizer. In that case you can consider installing a demo content (see above).
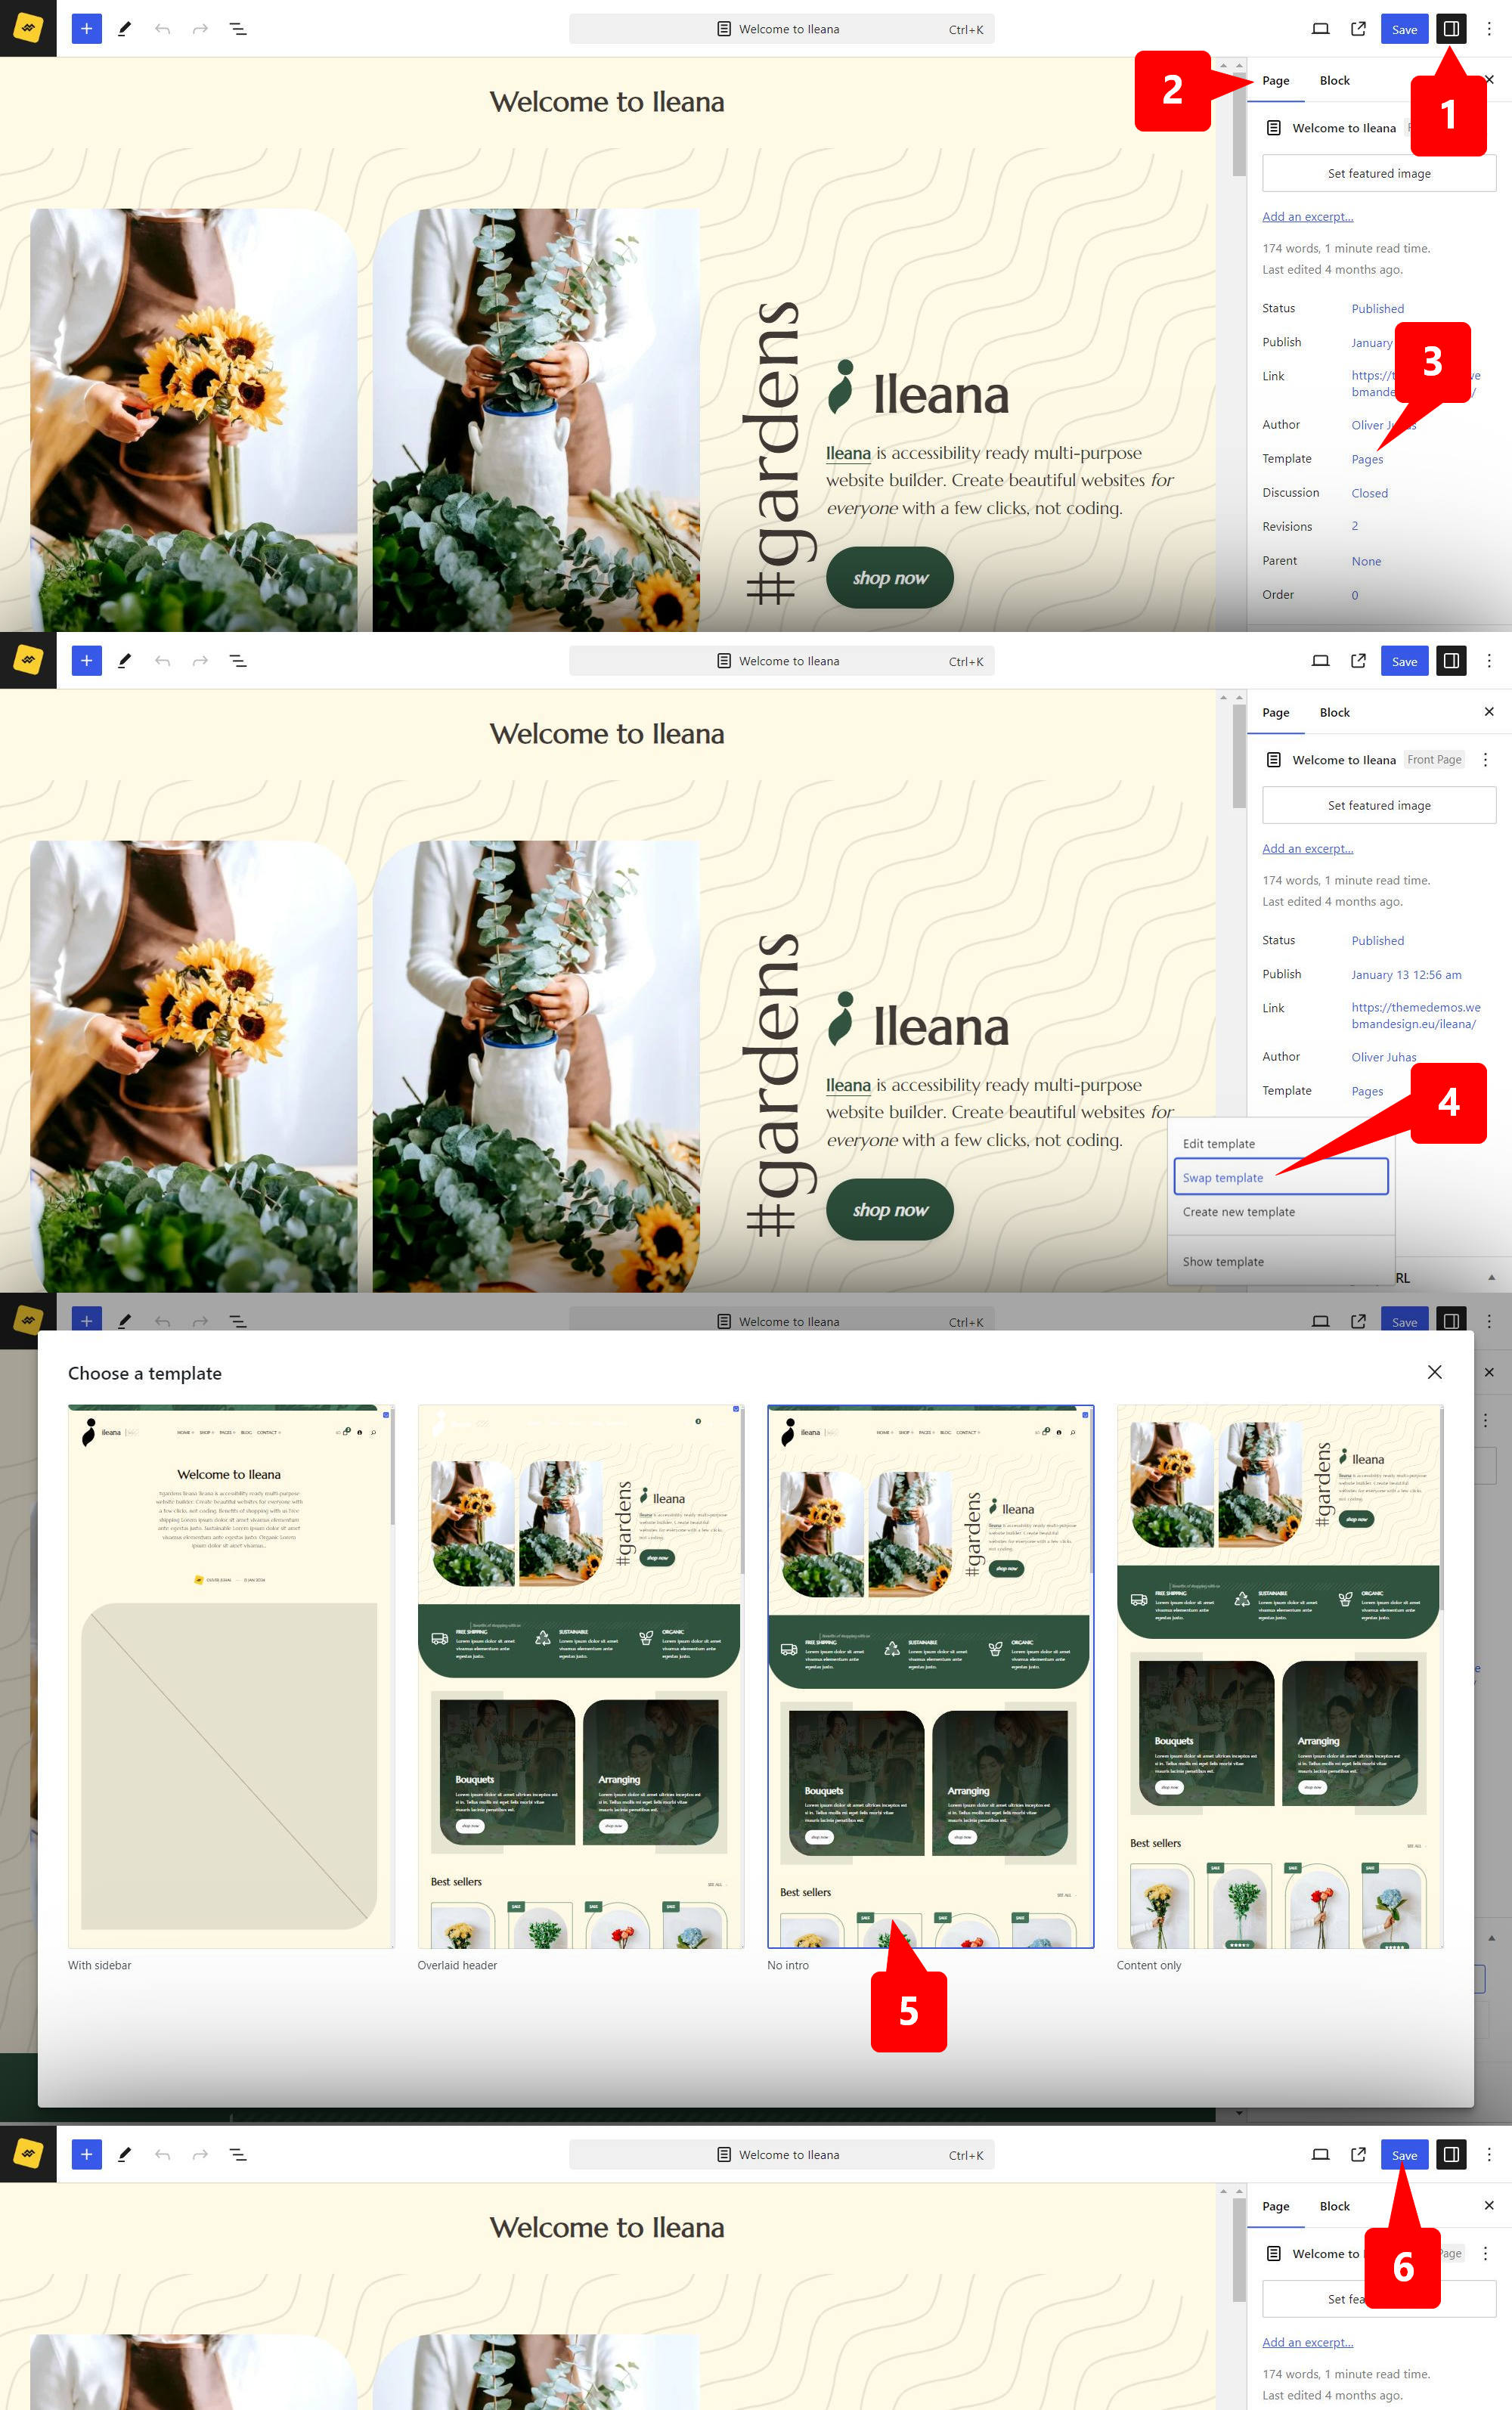
Displays only page content and so it's best suited for creating landing pages or used for no-distraction e-shop checkout page. There is no site header, no page intro title section (no h1 heading tag), and no site footer on this template.
It works with every public post type.
"Inverted header"
Use this template when you need to display site header with inverted colors due to your page content colors. The theme's site header covers/overlays the page content, so depending on your content colors you may need to use this template to adjust site header color appropriately. (The colors of site header variants can be set in theme options.)
Using this template will remove page intro title section and there will be no h1 heading tag added by the theme into the page. (This is the same behavior as with "No intro" page template.)
It works with every public post type.
"No intro"
Removes page intro title section and there is no h1 heading tag outputted on the page by the theme either.
It works with every public post type.
"Page builder" "Page builder with inverted header"
These 2 templates prepare content area for use with a page builder plugin. You can specify the correct content area layout for these templates in Appearance → Customize → Theme Options → Page builders, depending on what page builder plugin you use.
Using these templates will remove page intro title section and there will be no h1 heading tag added by the theme into the page. (This is the same behavior as with "No intro" page template.)
Use the inverted header variation if your page content colors requires such site header variant. (This is the same behavior as with "Inverted header" page template.)
These templates work with every public post type.
Tip:Automatic selection
If you are using Beaver Builder or Elementor page builder plugin, you don't even have to select this template when editing a page with the plugin. The theme will recognize them and applies the "Page builder" template layout automatically for you.
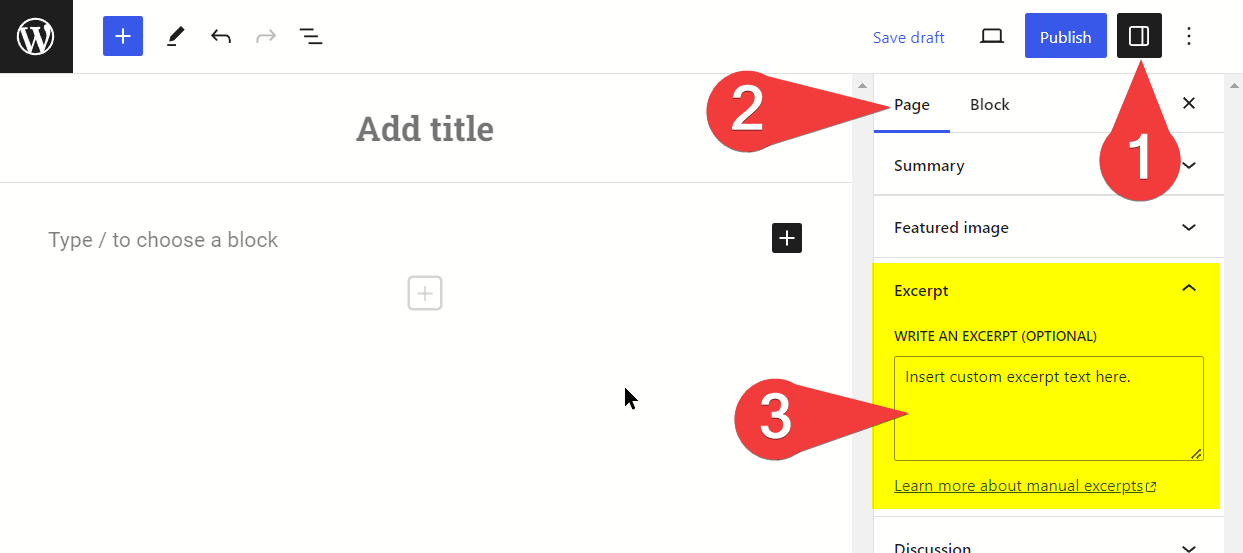
Excerpt will be displayed in posts list. If no excerpt is set, a portion of post content will take its place.
If you set a custom excerpt text for a post or page, this will be also displayed in page intro section (main title area) unless you hide it with a template.
By default WordPress displays a caption in the archive page title (such as "Category:" in front of a category name). Use Archive Title plugin to hide these labels.
This theme contains a built in featured posts functionality. Once you assign posts to your featured post tag, 3 most recent featured posts will be displayed above posts list on your blog page (as can be seen in theme demo website).
Francesca theme is compatible with WordPress block editor and supports wide alignment, color palettes, font sizes, and others. Using block editor allows you to create beautiful and performant websites with intriguing page layouts without a page builder plugin. Have a look at theme demo website for inspiration.
Visit WordPress blocks list for information on available blocks and how to set them up.
Warning:Incompatibility
Please note that WordPress editors are not compatible with each other. Editing content built in one editor will not work when using a different editor. Read knowledge base article for further information.
This theme contains a library of predesigned block patterns to help you create a custom website with ease and in no time.
Using block patterns
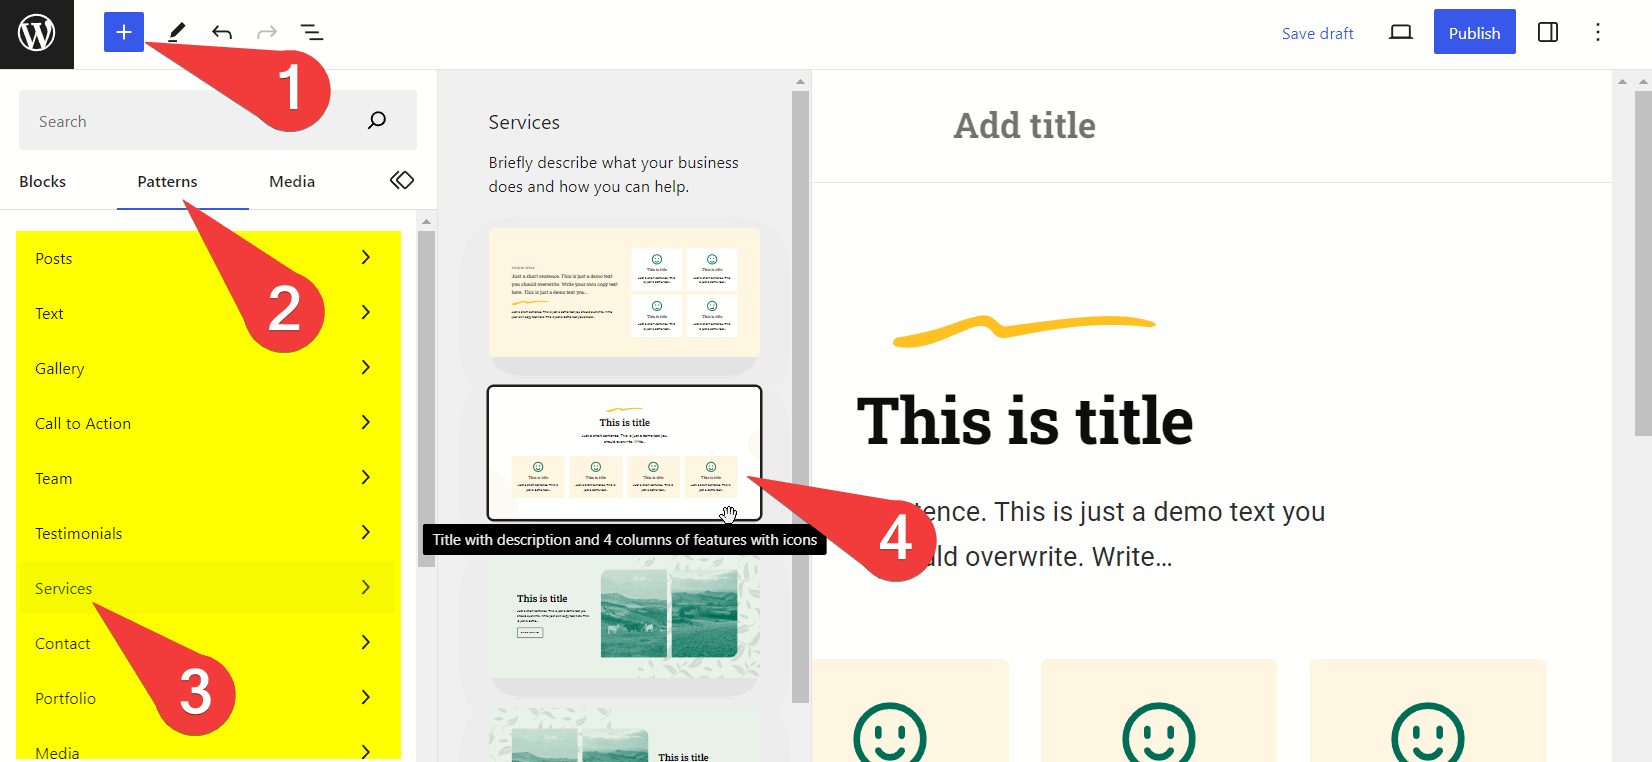
Adding a block pattern into page/post content
Illustrative image. May not represent this actual theme.
On page/post edit screen (in block editor) click the block inserter button (the + button in the upper left corner of editor).
Switch to "Patterns" tab. (Optional: click the Explore all patterns button at the bottom of the list of pattern categories to open block pattern inserter pop-up window.)
Choose a pattern category.
Select a pattern you want to insert into your page/post content.
Illustrative image. May not represent this actual theme.
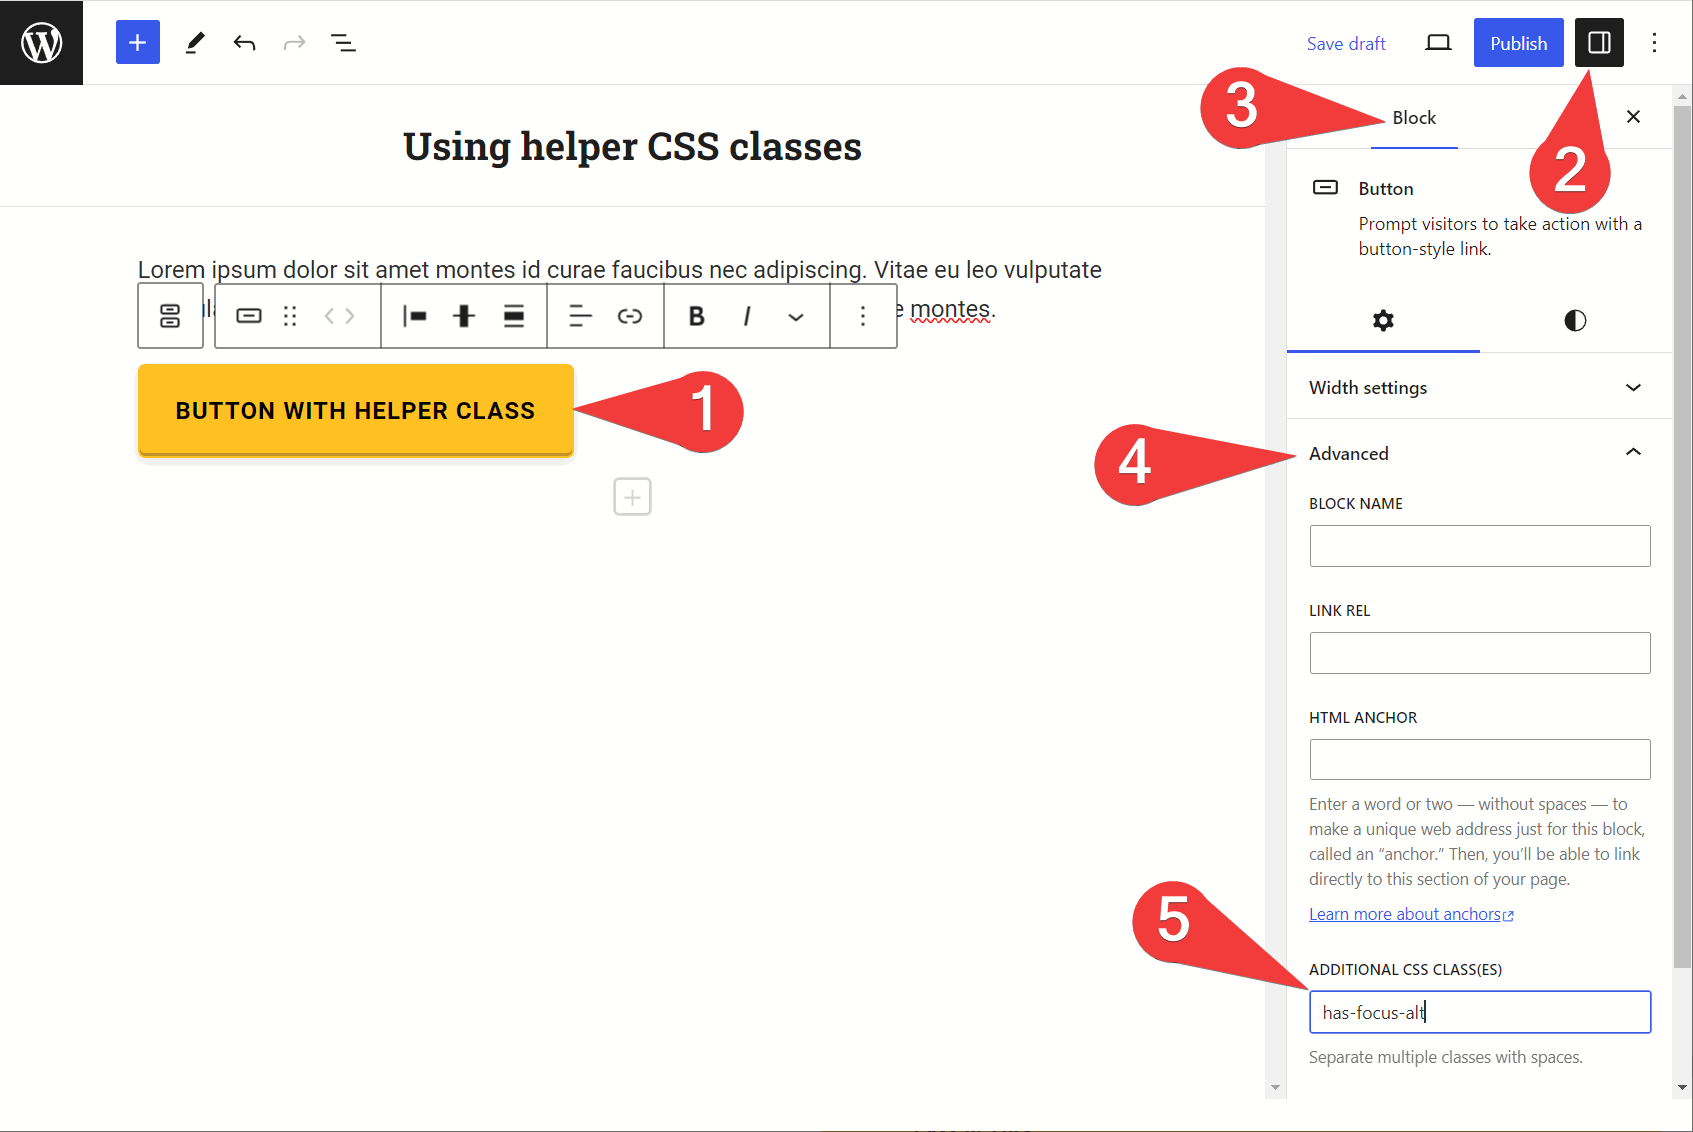
Click the block in page/post content.
If block settings sidebar is not displayed, click the settings button in the upper right corner of the editor.
Make sure you are editing the block settings (choose "Block" tab).
In block settings click the styles tab.
Choose a block style you want to apply on the selected block. (If there is no list of styles available, the selected block does not support any block style.)
Francesca lets you design your site footer and error 404 page content and add a content to site header with full power of block editor. No more theme layouts or sidebars and widgets - you are in full creative control now!
Go to Appearance → Customize → Theme Options → Content and follow instructions to set up custom content for each block area theme provides. (By default the theme displays reusable block posts in these block areas. You can go ahead and create a few of them first in Tools → All Reusable blocks so you can assign them in the theme options immediately.)
Tip:Useful block patterns
The theme also provide useful predesigned block patterns for these block areas. You can find them listed under "Site" category in block patterns selector in editor.
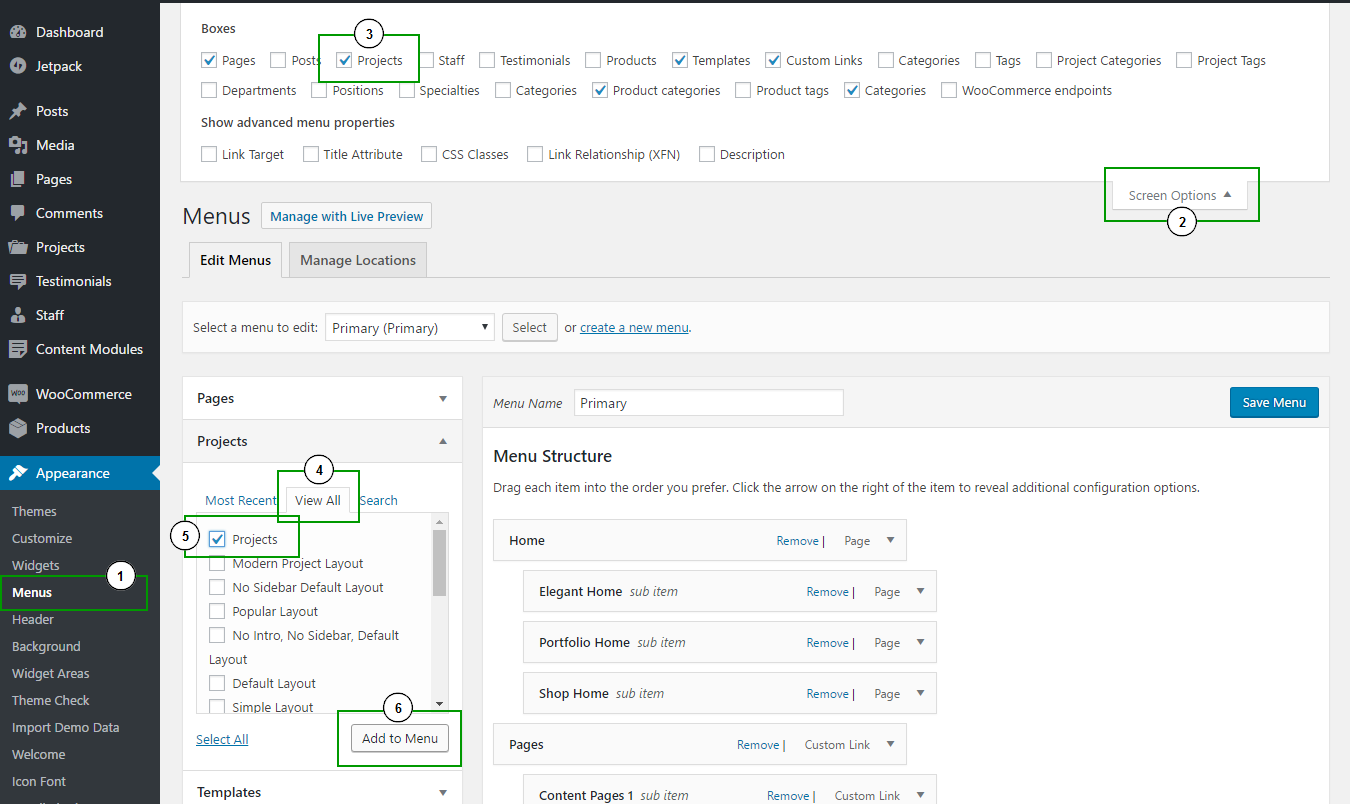
Navigational menus for your website can be created at Appearance → Menus. They may contain links to pages, categories, custom links or other content. You can specify a custom menu item label, as well as other attributes.
Display menus on your website by assigning them to a predefined theme menu location. The theme defines these menu locations for you:
Primary
This is the main navigation in the header of the website.
Menu in this location can be nested and hierarchically organized (up to 4 levels deep) and you can also use a simple megamenu functionality here.
It is also mobile-ready menu and, if needed, mobile menu functionality can be disabled in Appearance → Customize → Theme Options → Others.
This theme also supports menu item description text:
Setting up menu item description text.
Illustrative image. May not represent this actual theme.
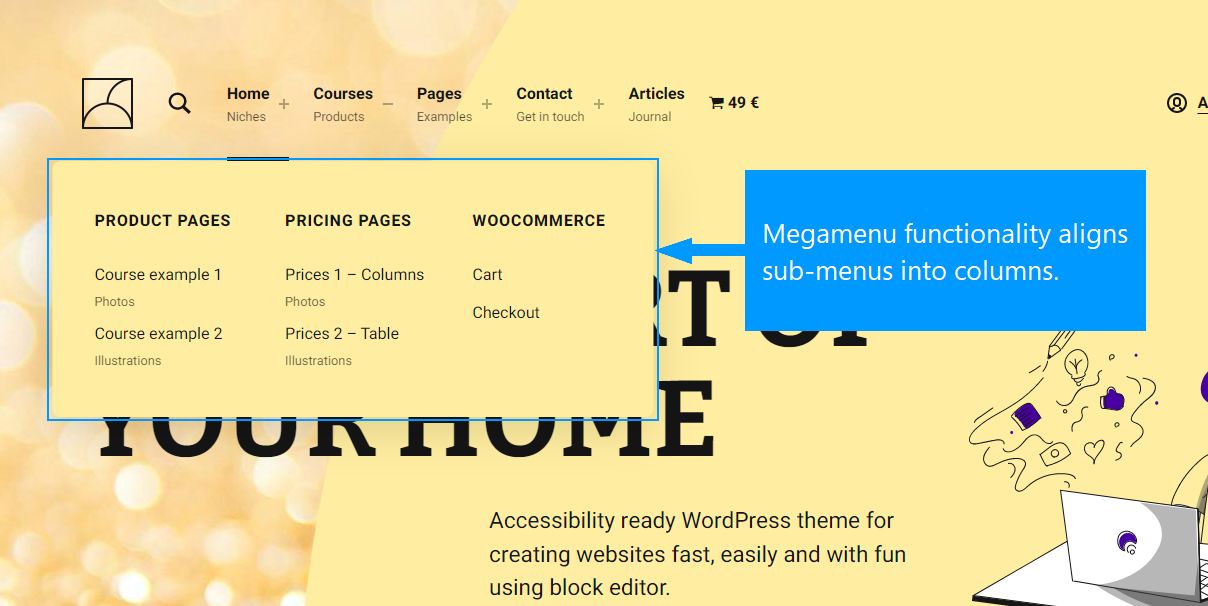
With built in simple megamenu functionality you can display child menu (sub-menu) items in columns.
Megamenu example preview.
Illustrative image. May not represent this actual theme.
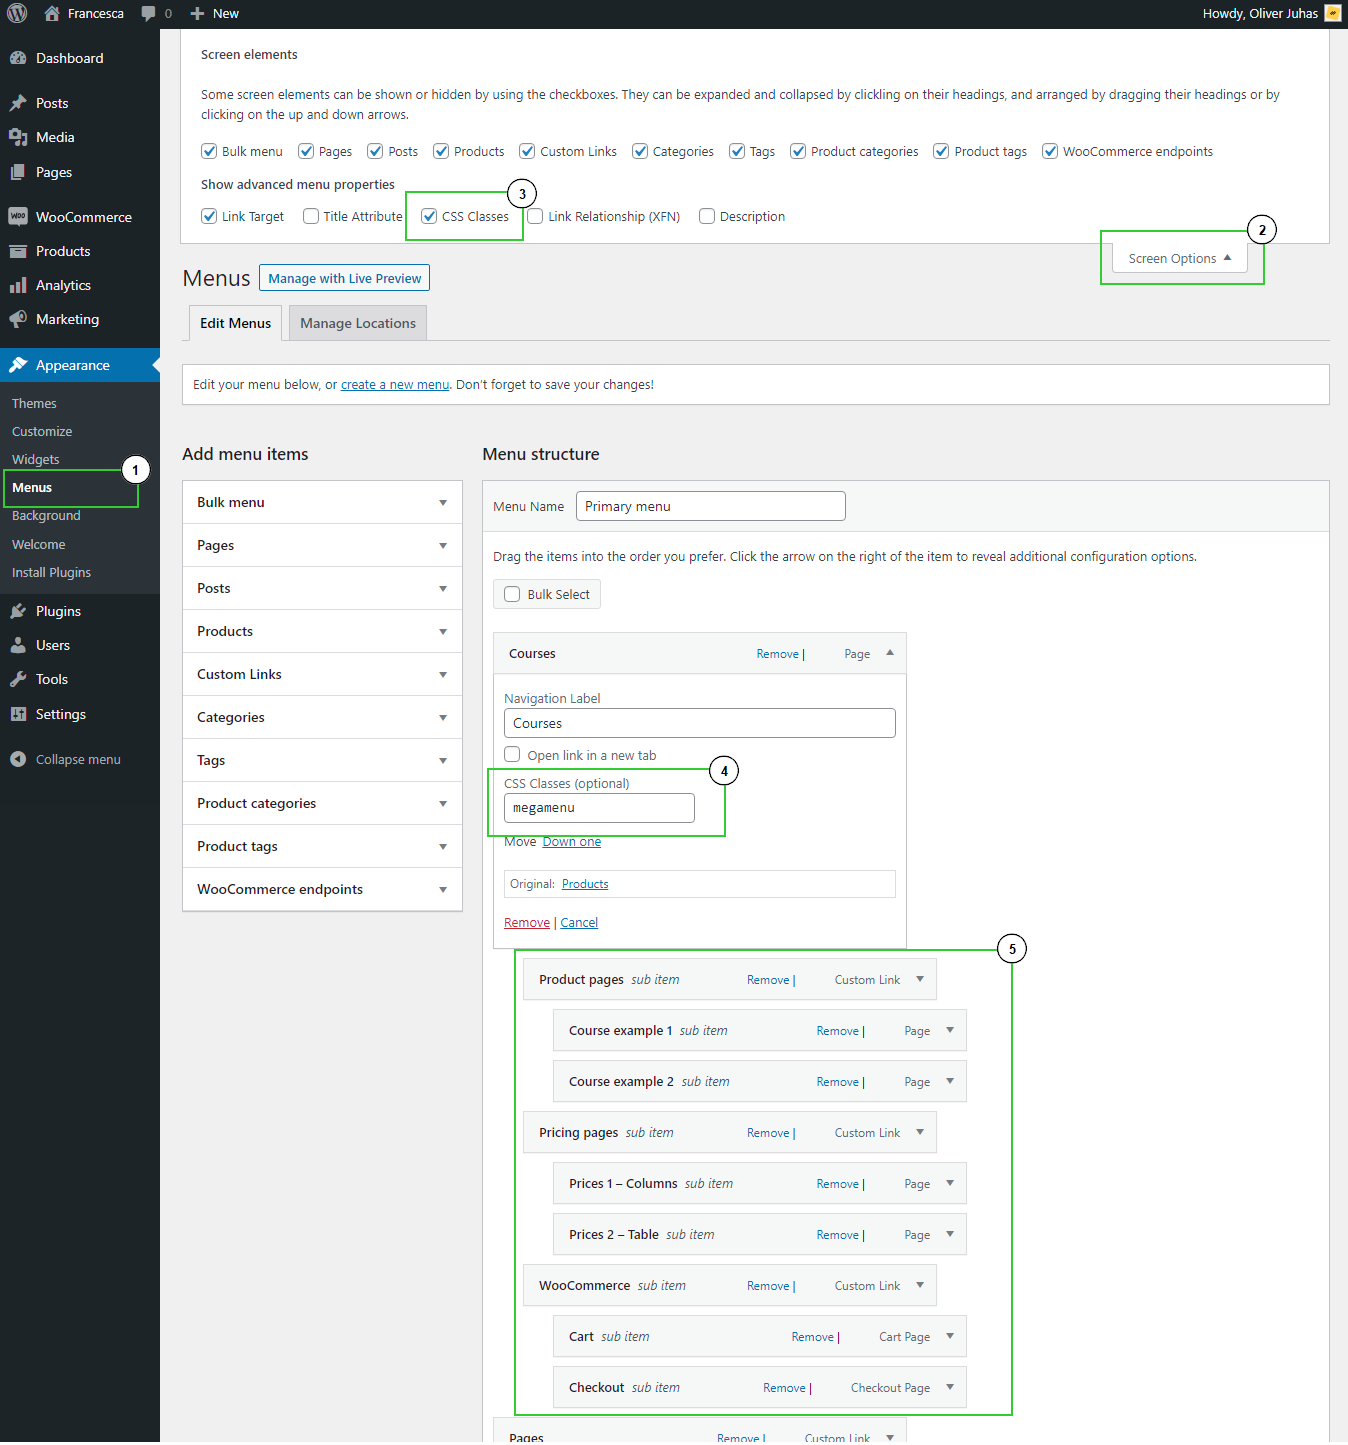
Set a megamenu class on the parent menu item (1st level menu item).
Setting up menu item class.
Tip:Fullwidth megamenu
Add the fullwidth CSS class (so it becomes megamenu fullwidth) to stretch the megamenu full width of the screen.
Then the 2nd level menu items (first child menu items) become captions for megamenu columns.
Tip:Disable link
You can set disable-link CSS class on these menu items to render their link inactive. It is still recommended to set their link to a dummy URL such simple as #0 would do.
Finally, the 3rd level menu items (second child menu items) become actual menu items within your megamenu columns.
WordPress 5.8 introduced a new block-based interface to widgets and sidebars management screen. As this may be confusing and possibly even cause incompatibility issues in some cases, you can consider reverting back the interface with Classic Widgets plugin.
Predefined Widget Areas
The content of widget areas (sidebars) can be customized in Appearance → Widgets or Appearance → Customize → Widgets. The theme predefines these widget areas:
Footer
Widgetized area in site footer displayed above footer blocks area.
Header
Displays in site header when the additional content is not set with blocks area.
Sidebar
Default sidebar displayed on blog and taxonomy and post type archive pages.
Tip:But do you even need a widget area?
Did you know this theme allows you to create your site footer and add additional site header content with block editor? So why bother using widgets for these? Check out info about block areas.
Using block areas gives you complete creative freedom in oppose to using sidebars and widgets.
Custom sidebars & website layout control
You can create a custom widget areas (sidebars) and use them anywhere on the website with a help of Content Aware Sidebars plugin.
That way you can control even displaying of the sidebar, effectively altering the page layout - limitless options, great flexibility!
Francesca seamlessly integrates its options into live preview customizer. You can set up your site's title, tagline and logo, home and blog page, manage menus and widgets, customize colors, layout, typography and others.
Customizer can be accessed at Appearance → Customize. All the changes you make in Customizer will be immediately displayed in the preview, but they will be made live only after you press the Publish button.
At Appearance → Customize → Theme Options panel you'll find theme-specific options. Check them out to get familiar with theme customization capabilities.
Every WordPress theme contains some texts that need to be translated into your language if you are building a non-English website. This theme if fully translation ready.
Make a copy of the original francesca/languages/francesca.pot file.
Rename the copied file now: add hyphen followed with your language code locale, and change the file extension to "po". For example, the British English file would be named francesca-en_GB.po.
Use Poedit to translate the file and export (save) translation in "mo" file format.
Upload translated francesca-en_GB.mo and francesca-en_GB.po file into your WordPress languages directory, into themes folder (such as /wp-content/languages/themes/francesca-en_GB.mo (if the themes folder does not exist in your WordPress languages directory, create it).
Warning:Don't lose your files!
When you update the theme, all custom translation files will be deleted from /wp-content/themes/francesca/languages folder. Do not put your custom translation files into that folder! Basically, you should never modify the actual theme files and folders.
Methos 2: Translating in WordPress admin
If you would like to translate the theme directly in your WordPress dashboard you need to use a specialized plugin. Check out Loco Translate plugin and instructions on how to use it at beginner's guide and technical overview.
Translate Plugins Too!
Your website is built with WordPress system itself, a theme and some plugins.
There is a high chance that WordPress itself is already translated into your language. So, you don't have to translate it on your own. You have also learned how to translate the theme above. But what about plugins and their texts?
If you are lucky, your plugin contains your language translations already and you don't have to do anything. But if you need to translate a plugin, the best advice is to check the plugin's documentation for the best approach.
Alternatively you can also use Loco Translate plugin (again) to translate your plugins directly in your WordPress admin area.
Share Your Translation
If you would like to help out translating the theme, please contribute your translations at WebMan Design support forum by submitting a ZIP package of your .po and .mo translation files in a new support ticket attachment. Thank you!
Accessibility in web development means creating a web site that everybody can use regardless of one's hardware, software, or sensory, or physical impairment. It is about building a barrier-less web.
While creating accessible website is a complex process that includes a content strategy, Francesca theme helps you with being accessibility ready out of the box. It complies to WordPress accessibility requirements and was built to help you create a website that passes WCAG 2.2 level AA requirements.
Among other features the theme itself applies proper headings structure, uses ARIA attributes and landmarks where needed, adds informative "read more" links, makes your website navigation keyboard accessible, creates skip links for you and provides sufficient color contrast in default color scheme.
However, please understand that creating an accessible website is not just about a theme. You need to apply accessibility principles also to your website content and be cautious when using plugins. For further information please read WordPress documentation about accessibility.
And for even more information about accessibility please check:
Content area of this theme was designed carefully to provide the best reading experience for your visitors. Maximum line width is set to roughly 70 characters (can be tweaked in theme options). With proper line height and spacing around elements it is easier for visitors to digest your website content.
To comply with accessibility guidelines, the theme follows this headings structure:
Max one h1 on any given page
Theme outputs only one first-level heading (HTML tag <h1>) on each page. This is reserved for a page main title.
Important:Exceptions in templates
Read more about exception from this rule applied with certain templates. For example, you can remove the h1 title altogether and create your own custom one in a page content.
Site title heading
Site title (logo) is rendered as h1 only on homepage with blog display. On other pages (including the static home page) the h1 tag is reserved for the actual page main title.
Hierarchy
Theme follows the best practice by hierarchically organizing heading levels, not skipping any of them. For example, h3 headings can be found only in a section titled with level h2 (and not h1). You should do the same when building your site content too.
Tip:Test it out!
In case you would like to test a page headings hierarchy, there is a great browser extension for this called HeadingsMap.
Why do you need to use plugins when you expected the theme to have all the functionality in it? Well, according to WordPress guidelines and generally the best practice: themes are meant for presentational purpose only, while plugins provide website functionality.
The reason for this is that when you decide to update your website looks you simply change a theme without loosing your website content and additional functionality such as eCommerce or portfolio.
This theme follows this WordPress philosophy and you can rest assured your site is as future-proof as possible. No lock-in effect with WebMan Design themes!
Info:Compatibility
The theme does not need any plugin to work properly. It is coded responsibly and flexibly enough so it should be compatible with any decently coded 3rd party plugin.
However, please understand there are thousands of plugins available for WordPress and it is not humanly possible to test them all. Feel free to use your plugin and in case of an issue contact support for help.
Theme provides code and/or design integration for certain plugins. You will find these plugins in recommendations list below. They provide additional functionality for your website or improve your and your visitor's experience.
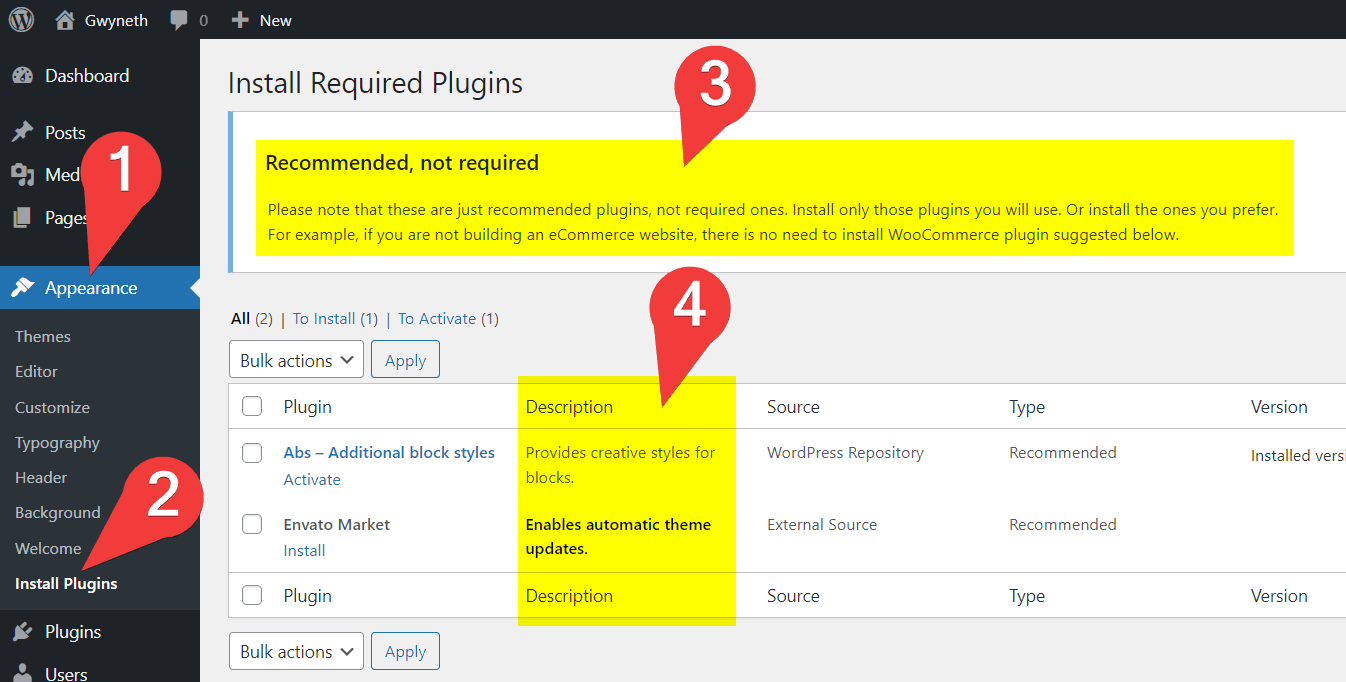
Please note that these are only recommended, suggested plugins, they are not required for the theme to work. Always read the plugin description before installing a plugin and install only those plugins you will use on your website.
Plugins recommendation page example: Recommended, not required
Illustrative image. May not represent this actual theme.
Warning:Demo content required plugins
List of plugins the theme recommends may differ from plugins that are required when installing demo content. Check the demo content information for more details.
Here is a list of plugins that were successfully tested with the theme and the theme even provides additional integration layer for them:
If your theme already provides block styles, the styles from this plugin will be added only (no block style is being replaced), so you might experience some duplicate block styles.
Toggle specific block styles in plugin options in Settings → Abs.
Restores the previous WordPress widgets settings screens. Sidebars and widgets are not going to be used in fully block themes in the future, so if your website still uses sidebars, it is better to use this plugin to enable classic user interface.
Add custom fields, content types (custom post types) and taxonomies to your website. With paid version of the plugin you can also create custom blocks.
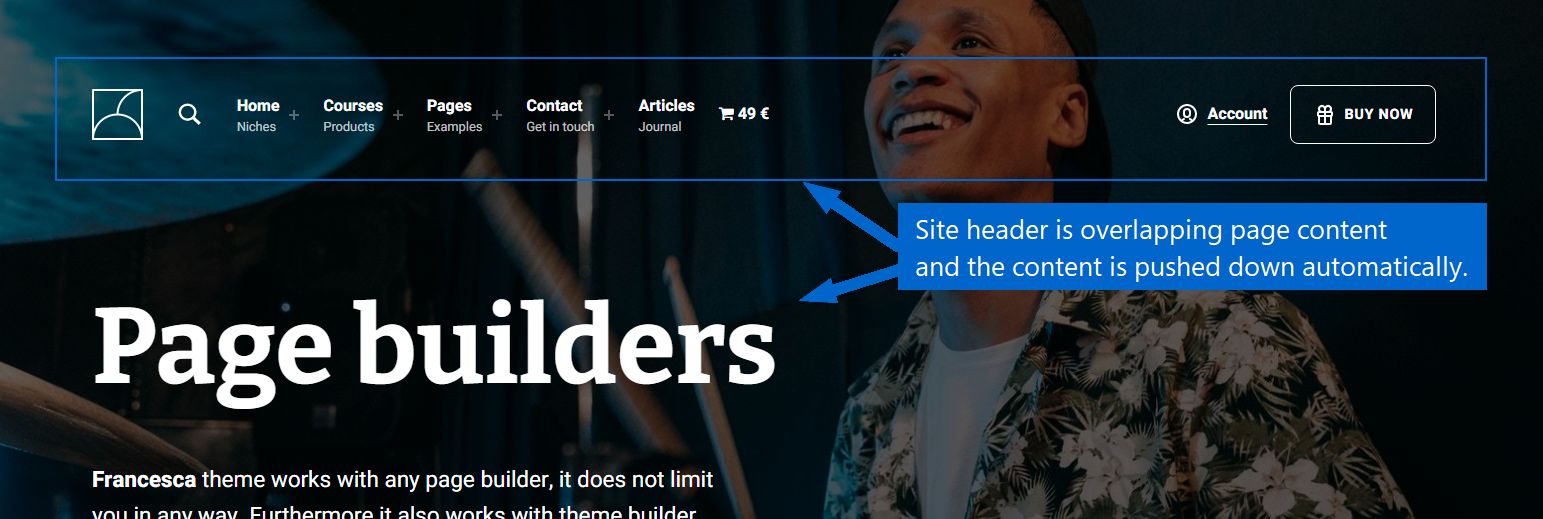
As you have probably noticed already, this theme renders site header as an overlay over the page content. This may cause issues when you are hiding the page intro (main title) with a template and you need to create a space for the header in your page content.
Example of site header overlapping page content
Illustrative image. May not represent this actual theme.
The information below is relevant only when page intro (main title) is hidden.
Automatic spacing
The theme is trying its best to apply the automatic space needed for the site header while not overlaying any actual text content of your page.
This is done only when you are using WordPress block editor (code named Gutenberg), and specifically when you are using either Cover, Group, Spacer or Media & Text block as the first block in your page content.
Tip:Disable automatic spacing
In case you don't need automatic theme spacing you can disable the "Make space for overlaid header" option in Appearance → Customize → Theme Options → Layout.
Forcing the space manually
When using block editor and any other block is the first one in your content, try to wrap it in one of the aforementioned blocks to apply the space automatically. Alternatively you can apply add-space-topCSS class on the block.
Unfortunately, there is no way for the theme to apply automatic spacing in all cases. This is especially true when you are using a page builder plugin to build your page content. In that case you can either set the appropriate space (top padding) on the first row of your page content with page builder, or simply apply the add-space-top CSS class on such page builder row (check your page builder documentation for how to apply custom CSS classes on elements).
If you want to build your website with a page builder plugin, you most likely need to select a "Page builder" template for pages and posts where you want to use your page builder plugin. Check the template description for more info.
Warning:Demo content compatibility
Please understand that if the theme demo content was not built with your page builder, you will not be able to use it to edit the imported demo content.
Once you set correct image sizes, all your newly uploaded images will get processed with new settings. But for the images already uploaded to your website you need to use additional plugin to refresh their sizes. Regenerate Thumbnails plugin (or similar) will do the trick.
This theme predefines some useful modifier CSS classes for you. You can use them in block editor, in a page builder, or however you find useful. These classes modify appearance of your website elements and blocks.
For full up-to-date list of the helper modifier CSS classes and instructions on how to use them refer to theme demo website.
Having a performant website is a must. It makes your website more SEO friendly and most importantly pleasing for your visitors, more accessible. This theme was coded with performance in mind but we can always take things even further:
Use a good host
A good hosting for your website is very important choice you can make towards a speedy website. Depending on your location it is also advised to use a host that has servers in your country or at least on the same continent.
You should always keep the file size of your website media as low as possible. Prepare images before you upload them to your website: compress them, reduce their dimensions, maybe even crop them. Use plugins to optimize further more.
In case of video and audio files set the optimal compression and formats before uploading them to your site. Consider also using services such as Vimeo, YouTube or SoundCloud to host your files off your servers.
But you will get better results using a dedicated solutions such as WP Rocket or WP Super Cache or SiteGround Optimizer. Or maybe your hosting provider applies some sort of caching already? Check with them.
Warning:Minify & combine
Your caching solution may provide CSS and JS files minification and combination. Be cautious though: these are complex processes which may cause errors on your website. Test thoroughly!
Tip:Measure performance
For measuring your website performance and tips on how to improve it use services such as GTmetrix, Pingdom Tools and WebPageTest.
By default, the theme supports any Google Fonts font out of the box. So, if you want to use a font family from Google Fonts, simply set it up in font family option fields in Appearance → Customize → Theme Options → Typography.
But if you want to use a custom font (a purchased premium font, or font not available at Google Fonts) follow this procedure:
Use a plugin to upload your custom font to your website, such as Custom Fonts plugin. (Or upload it by other means, such as via a child theme or child theme plugin.)
Set font family fields in Appearance → Customize → Theme Options → Typography to use your custom font family. (These fields take a value valid for CSS font-family property.)
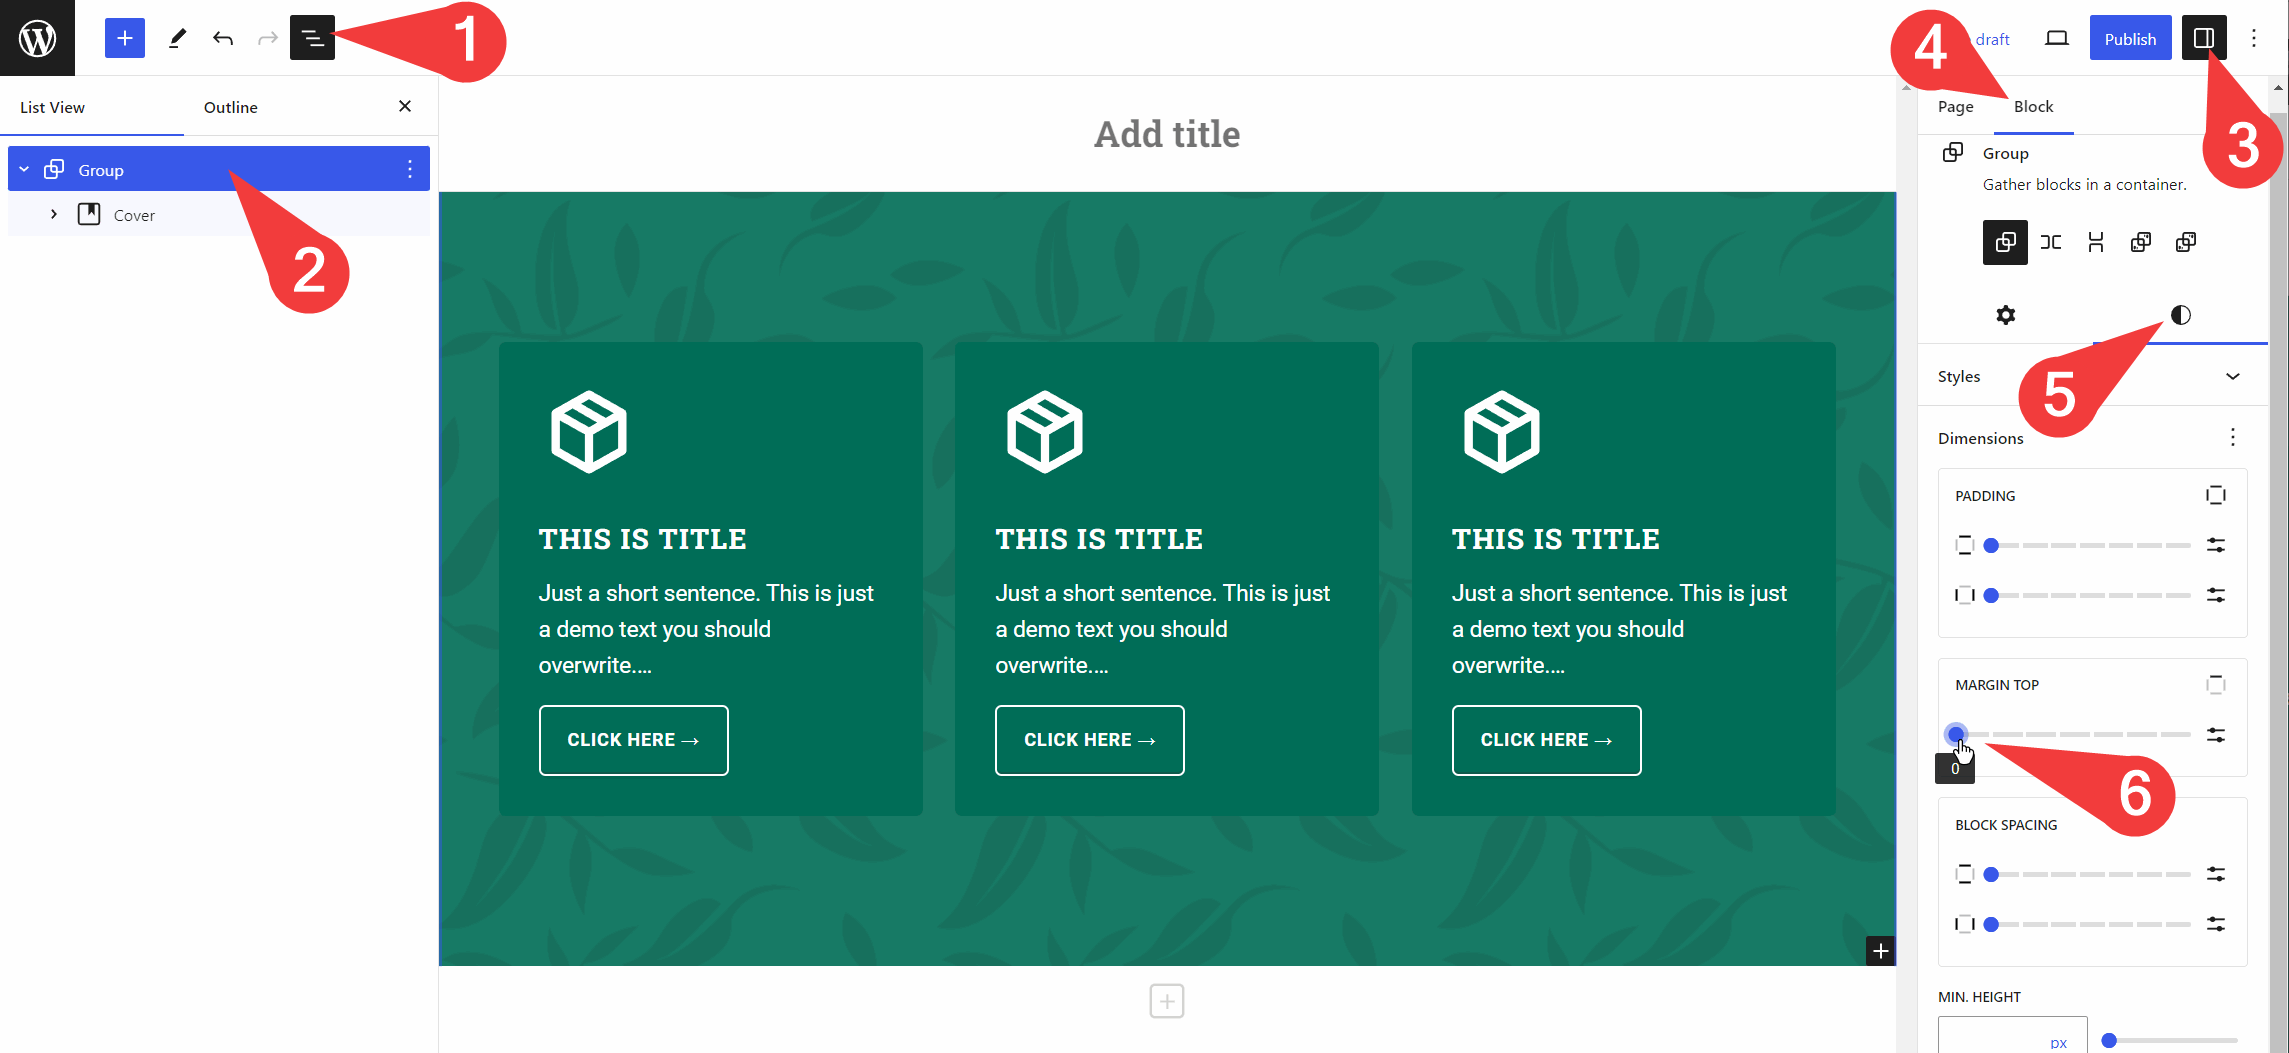
The theme applies vertical margin on elements to provide automatic harmonious spacing. Sometimes you may need to remove this gap between rows of columns with a background, for example.
To remove the gap, null out (set value to zero, 0) vertical margin (usually top margin) of the block in block editor, or element in your page builder.
Here is how you can set top margin in block editor:
Setting block top margin to zero
Illustrative image. May not represent this actual theme.
If you need to make coding changes to the theme or WordPress itself, use child theming functionality, or even more flexible"child theme" plugin solution.
This way you can update the parent (original) Francesca theme without worrying about your custom code getting overwritten and lost. Your code is kept safe in your child theme/plugin.
For more flexible approach that works with any type of theme (classic or FSE block theme), or for cases when you can't use a child theme, we have created a free "Child Theme" Plugin for you.
Info:Is using a "child theme" plugin better?
Using "child theme" plugin is mostly beneficial when you use a block theme (full site editing theme) for some time already and then you decide you need to modify something with code.
If you plan to provide means for future code modifications right from the start use a child theme, even with a block parent theme.
More technical details
Full site editing block theme compatibility with WordPress child themes concept is limited. This is due to Site Editor user-modifications being stored in WordPress database. It causes issues when you decide to use a child theme afterwards, because all of these database records are bound to a specific (parent) theme name.
Copying modified Site Editor options and layouts so they work with a child theme is more complicated process. Though, this complication is solved elegantly using a "child theme" plugin.
The plugin works the same way as classic child theme would - you can use it anytime, even after you've already made custom changes in Site Editor, and it involves less code in comparison to a child theme.
A downside of the plugin may be overriding parent theme templates with code:
With WebMan Design themes this should not be an issue as they are very flexible and contain useful action and filter hooks you can use instead.
Download a free child theme or plugin from WebMan Design GitHub repository. Don't forget to check the information in the repository for how to set them up.
Tip:Theme from Envato Market?
If you've obtained the theme from Envato Market, there is a high chance that a dedicated child theme is already included in the package you've downloaded from the marketplace.
Check out your files. Or download a sample child theme from the aforementioned repository.
The theme provides multiple useful action and filter hooks, which can alter its functionality. Check the theme's source code for hook references: simply search for do_action and/or apply_filters. Or contact support for help.
Francesca theme uses Theme Hook Alliance (THA) hooks too. This is useful to rebuild theme structure or add your custom sections anywhere.
Tip:Theme builder compatibility
This theme can be modified with a theme builder plugin such as Beaver Themer or Elementor Pro Theme Builder.